Construct Working Units in DPF Director
You create and edit working units in the working unit view of DPF Director. Each working unit opens in a separate tab.
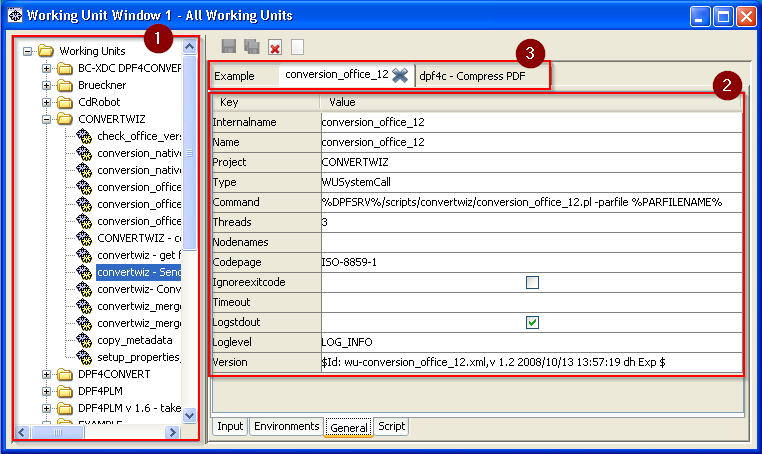
Here you see the DPF Director with the (1) working unit tree on the left, (2) the properties of the selected working unit on the right and (3) tabs for each opened working unit on the top.
The configurations of working units and processes are saved as XML files in the server\dpf\templates directory.
Undo
When editing processes and working units in DPF Director, it is not possible to undo changes! However, you can exit the process or working unit view without saving the changes.
The DPF server copies the configuration files to a backup file with the current date and the .bak extension whenever the configuration files are changed. In the case of emergency, copy these backup files to the original names and restart the DPF system.
Properties of a Working Unit
The following properties can be set for a working unit:
Codepage
Codepage specifies the codepage valid for the working unit.
Available values: Enumeration
-
UTF8The Unicode code page is used.
-
ISO-8859-1The Latin-1 code page is used.
Command
Command specifies the external script called in the working unit.
Fullname
Fullname specifies a short description of the working unit.
Ignoreexitcode
Ignoreexitcode specifies if the return code of the external script will be evaluated. Independent of this setting, the return code is always set as ExitCode parameter.
Internalname
Internalname specifies the internal name of the working unit. The internal name is used as default for the name of the external script in Command and the description in Name.
Loglevel
Loglevel specifies the log level for the working unit.
Available values: Enumeration
-
LOG_OFForOFFNo log messages
-
LOG_RUNorROnly start and stop messages; the identifier of these messages is
[R]. -
LOG_FATALorFLOG_RUNand fatal error messages; the identifier of these messages is[F]. -
LOG_ERRORorELOG_FATALand all errors; the identifier of these messages is[E]. -
LOG_WARNorWLOG_ERRORand all warnings; the identifier of these messages is[W]. -
LOG_INFOorILOG_WARNand info messages; the identifier of the messages is[I]. -
LOG_DEBUGorDLOG_INFOand debug messages; the identifier of these messages is[D]. -
LOG_TRACEorTLOG_DEBUGand trace messages; the identifier of these messages is[T].
Large file
With LOG_TRACE, the log files become very large and, therefore, slow down the system very much. For this reason, activate this log level only very selectively and deactivate it again as soon as possible!
Logname specifies the base name of the log file for working unit.
Available values: String
-
<basename>The
<basename>.loglog file will be written. -
""
No log file will be written.
Hint - best practice
In practice, specifying the Logname here is not necessary, cause the information is contained in the job-specific log file as well.
Logstdout
Logstdout specifies if the output of the external script is written into the log file in any case. For this, the log level must be at least LOG_INFO. If Logstdout is deactivated, the output is only written to the log file if the log level has been set to LOG_DEBUG.
Nodenames
Nodenames specifies the servers where the working unit is running.
Available values: String
-
<server1> <server2> ... <servern>Server where the working unit is running.
Project
Project specifies the project where you want to create the working unit.
Available values: String
Default: Project selected when opening the context menu in the working unit tree
Threads
Threads specifies the number of jobs that can be processed by the working unit at the same time.
Available values: Integer
Type
Type specifies the type of the working unit and by that the service that will manage its call.
Available values: Enumeration
-
WUJavaCallThe working unit calls a Java script.
-
WURestCallThe working unit calls the REST API.
-
WUSendbackWorking unit for sendback files.
-
WUSystemCallThe working unit calls an external script.
-
WUWaitThe working unit waits for the response of a another system without blocking other jobs.
Timeout
Timeout specifies the number of seconds after which DPF Working Unit Manager cancels the processing in the working unit for the job.
Available values: Integer
-
0No timeout is active for the working unit.
-
<n>After
<n>seconds, DPF Working Unit Manager cancels the processing in the working unit.
Version
Version specifies the version of the working unit.
Create a Working Unit
This is how you create a new working unit:
-
In the working unit tree, open the context menu and select
Newor click in the window on the right. A dialog is opened.
-
Enter the properties of the working unit.
Literature
For information about properties and their values refer to Properties of a Working Unit.
-
Click
OK.The new working unit appears in the specified project folder in the working unit result tree. If you specified a new project, the project folder will be created.
Edit the Properties of a Working Unit
When creating a working unit, you specify the properties of the working unit. If desired, you can change these later.
This is how you edit the properties of a working unit:
- Select the working unit in the working unit tree.
-
At the bottom of the window on the right, change to the
Generaltab. The general settings of the working unit are displayed.
-
Change the properties.
Literature
For information about properties and their values refer to Properties of a Working Unit.
-
Save the settings by clicking
 .
.The properties of the working unit are changed.
Edit the Input Parameters of a Working Unit
This is how you edit the input parameters of a working unit:
- Select the working unit in the working unit tree.
-
At the bottom of the window on the right, change to the Input tab. The input parameters of the working unit are displayed.
-
Change the input parameters.
Key: Specify the name of the input parameter.Value: Specify the default of the input parameter.-
Type: Choose the type of the parameter.Text: The input parameter is a text field.Select: For the input parameter, preset values can be chosen.Combo: For the input parameter, preset values can be chosen or a free text can be entered.Check: The input parameter can be activated or deactivated by clicking a checkbox.
-
Range: For input parameters of the Select and Combo type, you specify values that the input parameter can have. For input parameters of the Check type, you specify which values are passed on in the activated and deactivated status. Mandatory: Activate the checkbox if the input parameters must be specified.Description: Specify a short description of the input parameter. This description appears as tooltip when the working unit is integrated into a process.
-
Save the settings by clicking
.The input parameters of the working unit are changed.
Edit the External Script of a Working Unit
This is how you edit the external script of a working unit:
- Select the working unit in the working unit tree.
-
At the bottom of the window on the right, change to the
Scripttab. The external script of the working unit is displayed.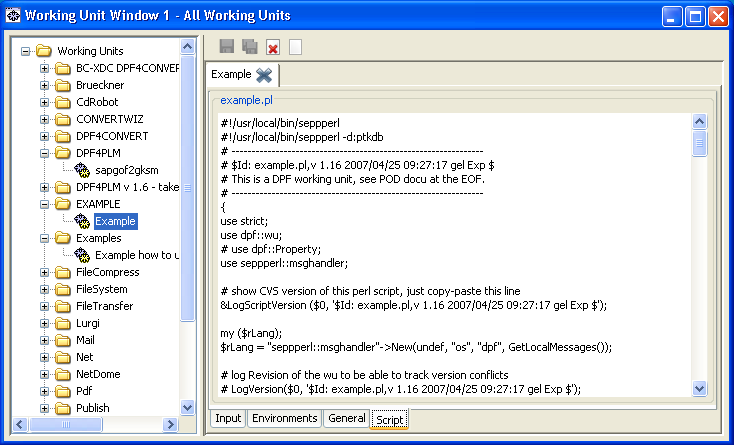
Hint - empty script
The
Scripttab is empty, if the script does not yet exist when creating a working unit. In this case, copy the script of another working unit:- Open the
Scripttab of another working unit. - Select the complete script by pressing
Ctrl+A. - Copy it by pressing Ctrl+C and insert it into the
Scripttab of the new working unit by pressingCtrl+V.
- Open the
-
Change the working unit script.
Hint - editor
If you want to make major modifications in the script and to use a more capable editor for this, copy the script into this editor and copy it back to the Script tab after finishing the modifications.
-
Save the settings by clicking
.The script of the working unit is changed.
Edit the Environment Variables of a Working Unit
This is how you edit the environment variables of a working unit:
- Select the working unit in the working unit tree.
-
At the bottom of the window on the right, change to the
Environmentstab. The environment variables of the working unit are displayed. -
Change the environment variables of the working unit.
-
Save the settings by clicking
.The environment variables of the working unit are changed. The environment variables are valid for calling
Command.
Move a Working Unit to Another Project
This is how you move a working unit to another project:
- Select the working unit in the working unit tree.
- At the bottom of the window on the right, change to the
Generaltab. - Select the other project in Project or, if it is a new project, specify the project name here.
-
Save the settings by clicking
.The working unit appears in the specified project in the working unit tree. If you specified a new project, the project folder will be created.
Limit the Number of Concurrent Running Working Unit Threads
Among others, Working units contain conversions by external scripts. In order to ensure that license conditions are kept, for example if only three conversion licenses are available, restrict the number of jobs concurrently processed for the working unit running this conversion.
This is how you specify the number of jobs concurrently processed by a working unit:
- Select the working unit in the working unit tree.
- At the bottom of the window on the right, change to the General tab.
- Enter the maximum of licenses in Threads.
-
Save the settings by clicking
.This limit ensures that only the specified number of jobs are converted in the DPF system at the same time. Arriving jobs are queued. As soon as one of the threads becomes idle, it takes the next jobs from the queue and starts the conversion.
Activate Concurrently Running Working Unit Threads
By default, DPF Working Unit Manager starts only one thread for each working unit, that means that the jobs are not processed concurrently. If a working unit is identified as bottle neck in the process and this is not due to missing resources, the performance might be better if jobs are processed concurrently.
This is how you specify the number of jobs concurrently processed by a working unit:
- Select the working unit in the working unit tree.
- At the bottom of the window on the right, change to the
Generaltab. - In Threads, how many jobs the working unit can process at a time.
-
Save the settings by clicking
.DPF Working Unit Manager starts multiple threads of this working unit so that multiple jobs can be processed at the same time and the working unit's queue will be processed faster.
Change the Icon Displayed In DPF Tracker
In the job list in DPF Tracker, icons are displayed in the Status column. These icons depend either on the working unit or on the job status.
In delivery, some icons for different job states and for some working units are included. The icons are formatted as PNG and are located in the server\dpf\filepool directory. For older Web browsers, GIF files are supported.
This is how you add a PNG file as icon for a working unit:
- Copy the PNG file into the
server\dpf\filepooldirectory. -
Rename the PNG file as the name of the working unit and add
.pngas extension.DPF Tracker shows the icon when the working unit is processing a job.
Example of an icon for the stamptiff working unit
server\dpf\filepool\stamptiff.png
Suppress the Return Code of a Working Unit
A job processed by a working unit with a return code other than 0 is stored as erroneous by default. However, this might be not wanted if the process handles the error case itself.
This is how you suppress the return code of a working unit:
- Select the working unit in the working unit tree.
- At the bottom of the window on the right, change to the
Generaltab. - Activate
Ignoreexitcode. -
Save the settings by clicking
.A job processed by a working unit with a return code other than
0is not stored as erroneous. However, theExitCodeparameter is set and can be evaluated by the process.Hint - timeout
If you activate
Ignoreexitcodeand setTimeoutto a value greater than0, the job returns553648141in the case of a timeout and is not stored as erroneous.
Send Back a Directory Tree
The sendback working unit can receive a directory as target and pass all files back to DPF Batch Client. DPF Batch Client creates the same directory tree in the target directory.
This is how you return a directory tree:
- In the working unit tree, select the sendback working unit, that means the
Send file(s) back to dpfclientitem. - At the bottom of the window on the right, change to the
Inputtab. - In the
Sourceparameter, specify the source directory. -
In the
TargetDirparameter, specify the target directory with absolute or relative path or "" to create the directory in the current directory.Hint - target directory
To set the
TargetDirto the name of the source directory, add a modify module withTargetDir = c:\temp%Source.fileName%for evaluating and appending the name of the subdirectory.Hint - empty directories
Empty subdirectories are not passed or created.
-
Save the settings by clicking
.
Create a Remote Working Unit
Some tasks, such as conversion by means of the CAD system, only can be purpose executed on specific servers. For this, you create a remote working unit which is executed on these servers and is assigned by the DPF system.
This is how you create a remote working unit:
- In DPF Director in the working unit tree, select the working unit that is to work as remote working unit.
- At the bottom of the window on the right, change to the
Generaltab. - In
Nodenames, specify a variable, for example,%REMOTENODES%. - Save the settings by clicking .
-
Configure the variable specified above (
%REMOTENODES%in the example) in the respective element in theserver\dpf\templates\main.customer.xmlconfiguration file:xml hl_lines="5,7-9" <DPF> <config> <nodenames> <node NAME="dpf_server"> <REMOTENODES> remote_server1 remote_server2 ... </REMOTENODES> <DEFAULTNODE> %DB_HOST% </DEFAULTNODE> </node> </nodenames> </config> </DPF> -
Check if the explicit name of the PostgreSQL database server has been specified in
server\postgresql\conf\postgresql.cfgand not localhost, for example:[postgresql] PGHOST = VAPPAG12 PGPORT = 7128 -
In
server\postgresql\conf\hba_dpf.cfg, permit the servers where the remote working unit is to be running to access the PostgreSQL database.The remote working unit are started on the specified servers.
Hint - all servers
If many servers are involved, you can allow the access for all servers, too. For this, start sysinit and answer Y to the correspondent question for the database configuration.